
I became an ambassador for Coffee Cup Software before my page was even on the web. I help promote Coffee Cup Software and attempt to help people to make their web pages better. My page is still growing, and I am still learning myself....

The Rust Bucket
Let me first thank my good friend Dave, of Pearce Woodworking for this great idea. Dave had some used hand tools he needed to clean up and had located this method through various 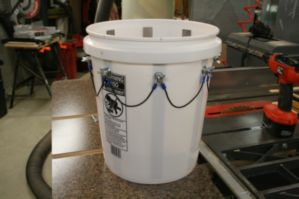 websites. Dave built a couple versions - he built a large one using a trash can so he could clean a band saw table, and a smaller one for his hand tools.
This process is a simple way to remove rust from steel, without hurting the material under the rust. The item is submerged in an alkaline solution (washing soda and water) and connected to the negative lead of a small battery charger. The positive lead is connected to a steel anode that is also in the solution. A reaction occurs when the power is applied and the rust comes off! This system works great. The leftover water can be dumped on the lawn as fertilizer. Here's how mine went together...
While in the process of designing and building my unit, I made the decision to make more then one. This involved building various jigs to make that easier. This article covers the construction and use of the various jigs as well.
I picked up all of my parts from Lowe's, but any hardware store should have what is needed. Here's my list:
| Quantity | Item | Description |
|---|---|---|
| 1 | 5 Gallon Bucket | Standard plastic bucket |
| 8 | Flat Steel 1/8" x 1" x 1' | Comes in 3 foot sections that I cut to size |
| 1 | Hex Bolts | 1/4-20 x 1" Standard steel bolts |
| 1 | Hex Nuts | 1/4-20 Standard steel nuts |
| 1 | Flat Washers | 1/4" Standard steel washers |
| 1 | Star Washers | 1/4" Standard steel washers |
| 1 | Wing Nuts | 1/4-20 Standard steel nuts |
| 1 | Eye Bolt | 1/4-20 x 2 inch long maximum |
| 1 | Crimp Terminals | 1/4" hole or lug |
| 1 | Chain | 6" Optional - to hang part with |
| 1 | Battery Charger | 6 & 12 volt |
| 1 | Washing Soda | Sodium Carbonite (Grocery store item) |
In addition to these materials, you will need a piece of wood for the part holder, some zip cord wire (about 3 feet), and a wire brush
How to build it
Before I give the instructions on building this, just a few notes on safety. When cutting or drilling, remember to wear safety goggles or glasses. If you are using power tools, keep all  guards in place. The simplest of procedures can lead to danger if you are not careful.
I first had to cut the steel into 1 foot long sections. This was accomplished using a metal cutting band saw (but you could do it with a hacksaw as well). If you are cutting the steel with a band saw, remember to lubricate the surface of the steel with some cutting oil (This will actually make cutting them with a hacksaw work better too!).
After cutting the steel, I used a brass wire wheel on my grinder to clean up the ends (I would suggest doing this to avoid the chance of getting cuts from the sharpened edge). This could also be accomplished with a good file.
After cutting the steel, holes had to be drilled to accommodate the screws. I measured 2 inches from the end of each bar and drilled a centered hole using a 1/4 inch drill bit (I used a drill press but you could use a hand drill). Make sure you lube the steel when drilling - the bit will get very hot so go slow. After drilling, make sure that the holes will accept a 1/4" bolt (you may need to use a file on the holes to clean them up).
The container I used is a standard 5 gallon paintbucket. The steel will be attached to the inside edges of the bucket using the 1/4" bolts. In order to do this, you will need to drill 8 holes evenly around the top edge of the bucket.
Locating the bucket holes
While the placing of the holes around the bucket is not that critical, I wanted to be able to duplicate  my efforts with ease (as I wanted to be able to make more). I looked around the shop and located some various scraps to build a couple of jigs.
The first jig I assembled was a guide to locate the eight holes around the sides of the bucket. This was built as follows: I first cut a small piece of wood (an off cut from a two by four) to about 18" long, by 1/4" thick. I glued on two small pieces of wood to one side of this. The first piece was added in order to be able to provide a shelf in which I was going to lay my carpenters square (detailed later). The second piece was added so the "straight edge" would sit flat on top of the bucket. I then located the center of the finished piece, then measured edge to edge on the bucket. Marks were made to show the edges of the bucket on the guide, and using my band saw, I trimmed the shelf up to the line.
Using the guide
To use the guide, I first located the first two holes on the bucket - my reference for the first two was the location of the two handle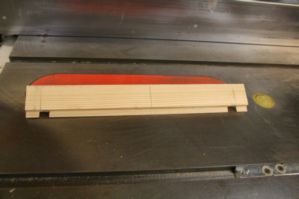 connections. I marked the top of the bucket right above those holes on opposite edges. I then placed the guide into position on top of the bucket, with the back edge of the guide even with my marks, centered using the edge marks on the guide. To find the next two holes, I laid a carpenters square on the shelf flush with the edge. The tip of the carpenters square hung partly over the edge of the bucket. This is the location of the third hole. This procedure was repeated with the other side of the bucket for the fourth hole.
To locate the last four holes, I once again laid the straight edge guide as before, centering the guide on the first two hole locations. This time, I flipped the carpenters square over so I could use the 45 degree edge of the square. When placed on the shelf in this fashion, the edge of the square now rested above the location for the fifth hole. I repeated this procedure for the remaining three holes, marking them as I went with a thin pencil line. I now had eight evenly spaced lines around the top of the bucket. Look at the following pictures for more detail.

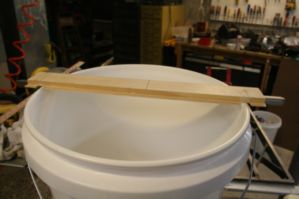
The first and second marks line up with the bucket handle.
The edge guide is lined up with the first two marks.

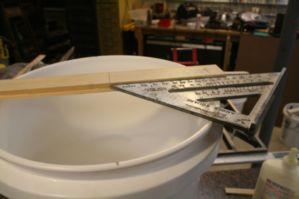
Using the 90° edge of the square for the third and fourth marks
Using the 45° edge of the square for the 5th, 6th, 7th, & 8th marks.
The Drilling Jig
The second jig that I built was for actually drilling the holes around the sides of the bucket. I needed a way to drill a hole at the same height for all eight holes. I could have  simply used a tape measure to make a mark, but I wanted something that was repeatable as I planned to make more than one unit. I had some scrap MDF that had been cut previously with a channel down the center. This channel provided two contact points that would touch against the curve of the bucket. I noticed a slight problem because the MDF was only 1/2 inch thick - the guide would slip under the rim of the bucket. To fix this, I glued a small piece of wood along the top of the MDF as an edge guide. This not only prevented the jig from sliding under, it also provided a larger surface to ensure the jig was straight. I marked a center line in the jig, and drilled a hole along the line at the proper location.
Using the guide was easy. I just lined up the jig with one of the lines on the bucket, and drilled each hole. I was able to drill all eight holes in under a minute. Had I used a tape measure and marked each one, it would probably take at least 10 minutes (That what jigs are for!). See the pictures below for additional detail.
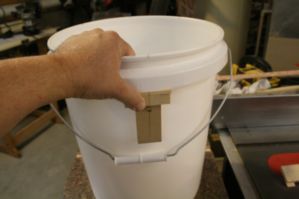

The jig is lined up with one of the lines on the bucket.
Easy to drill with this simple jig.
I was just trying to be neat, it does not have to be exact. After marking the top edge of the bucket evenly with 8 marks, measure down the side of the bucket (at each mark) 3" and make another mark - this is where you will drill your holes
Take one of the bolts, place a star washer on it and slide it through one of the steel plates. Attach the plate onto the inside of the bucket with a standard washer and a hex nut finger tight. Repeat this procedure for the other 7 plates. Making sure the plates are 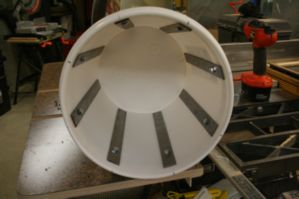 straight, tighten the hex bolts using a wrench.
Cut some zip cord (extension cord wire) into 6" lengths and strip the ends about a 1/4". Using a crimping tool, hook a connector on each end of the wires. You will need 8 of these. Connect the bolts around the outside top of the bucket using these short leads, a washer, and a wing nut. The wires should go to every bolt. This completes the bucket assembly.
Fashion a piece of wood about 2" wide and 16" long. Using a 1/4" bit, drill a hole on the center of the wood piece. Insert the threaded end of the eye bolt through the hole and secure using a 1/4" nut and a washer. Drop an additional washer over the exposed stud and add a wing nut. You are finished with assembly of the unit.
Using the Rust Remover
Hazard warning: This procedure uses Sodium Carbonate (Washing Soda) to generate an alkaline reaction with the water. While the stuff is only slightly hazardous (it's very similar to Baking Soda), I thought that I should list the hazards here;

Inhalation:
Inhalation of dust may cause irritation to the respiratory tract. Symptoms from excessive inhalation of dust may include coughing and difficult breathing. Excessive contact is known to cause damage to the nasal septum.
Ingestion:
Sodium carbonate is only slightly toxic, but large doses may be corrosive to the gastro-intestinal tract where symptoms may include severe abdominal pain, vomiting, diarrhea, collapse and death.
Skin Contact:
Excessive contact may cause irritation with blistering and redness. Solutions may cause severe irritation or burns.
Eye Contact:
Contact may be corrosive to eyes and cause conjuctival edema and corneal destruction. Risk of serious injury increases if eyes are kept tightly closed. Other symptoms may appear from absorption of sodium carbonate into the bloodstream via the eyes.
I guess that if I wanted to translate, I would say: don't roll in the stuff, don't eat it, stick it in your eyes (or any other place). Like with any chemical, treat it with respect. Use some kitchen gloves when handling your part in the solution. Did the above information scare you? Good! Let's get started
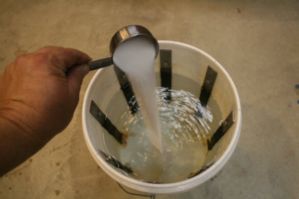
Another safety note: This process generates small amounts of Hydrogen & Oxygen, I would suggest doing this outside or in a well ventilated garage. Also, because this uses a battery charger connected to house current, you need to locate the charger below the bucket (Don't put it on a bench overhanging the bucket!).
Fill the bucket with 3 1/2 gallons of water (fill it to about an inch below the bolts near the top). Add about a third of a cup of washing soda to the water and stir to dissolve. Hang the part you wish to clean of rust from the eyebolt using a small length of chain and S hooks (you can also hang it with a small length of solid wire). You may have to polish a small section of your part in order to make good electrical contact.
The part should be fully submerged in the  water with the wood piece laying across the top of the bucket. With the battery charger unplugged, connect the negative lead to the bolt on the center of the wood (above the part). Connect the positive lead to one of the bolts around the outside of the bucket. Make sure the submerged item is not touching any of the steel plates around the edge of the bucket.
Plug in the battery charger and watch the cool bubbles rise to the surface as the process begins (I was able to use the 6 volt setting just as effectively as the 12 volt). If you do not see the bubbles, current is probably not flowing. Check the lights on the charger first, then unplug the unit. You may need a better connection on the actual part. I had to polish the surface on a few items, then wrap a wire tight against the clean spot. I then hung the part using the wire. Once you have current flowing, check the unit every half hour or so to see the progress. Unplug the charger before removing the item.
On many battery chargers, there is either a meter or a light to indicate "fully charged". If that is lit, current is not flowing. make sure that your item is in good contact with the negative lead. Also, try setting the charger to the six volt setting. My charger also has a light for a fault condition (this occurs anytime it detects a short). This does not hurt the unit, but it does shut the charger off. You will need to unplug the unit to reset it.
The charger that I used is available from Amazon for about $30.00. The Schumacher SEM-1562A 1.5 Amp Slow Charge Battery Companion is a 1.5 amp charger. While used mostly for slow charging or just keeping your battery "UP" this one works quite well for me. One of the nice features of this unit is the charging cord. The cord has a connector on the end that hooks up to two
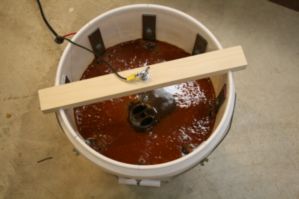 different sets of charging leads. The standard lead is a short length of wire with giant charging clips for clamping directly to a car battery. The other set terminates in leads that can be bolted directly to a car battery. This is the lead that I used for my system. This allows me to simply disconnect the connector (leaving the lead in place) and use the charger elsewhere with the other set of leads.
Depending on the amount of rust build-up, some sections of your item may need some cleaning with a brush. I wore gloves when cleaning my parts to avoid staining my hands. This should be followed up with a good cleaning of the item using plain water (and maybe a little detergent). You should dry the piece immediately to prevent the rust from returning. It would also be a good idea to paint or coat the item with something to provide protection from future rusting. I dried some of the parts I had removed rust from in my home oven. I laid the piece on the oven shelf and set the temperature to 110 degrees. This dried even internal areas on my part within a couple hours. After using the unit, rust will built up on the steel strips around the inside of the bucket. Using a wire brush, clean the rust from the strips after each use. I cleaned mine with the solution still in the bucket, then dumped the bucket in my back yard (fertilizer!). You can continue to use the same solution if you want, just let the deposits settle overnight.
Final Comments
This system can be expanded. I needed to remove rust from a large grill piece, but it would not fit in my bucket. Rather than take the unit apart, I chose to use a larger bucket. I built a really quick unit using some steel  reinforcing bar (rebar) as the anode. I used a large storage tote as the container and attached the rebar with some duct tape. I linked the rebar together with some zip cord and electrical tape. Water and washing soda were added next (one tablespoon soda per gallon of water). In this particular case, I used a larger battery charger due to the larger volume of water. The part was placed into the tote, and the cables were hooked up. It worked great!
I designed this version of the unit to be a handy tool in the fight against rust. I now have this available either assembled or in kit form. The kit will take about a half hour to assemble with minimum tools (a couple of end wrenches for tightening the bolts). If you are interested, check out my Buy Stuff page (This will be updated soon - as the kit is not available yet!).

