
I became an ambassador for Coffee Cup Software before my page was even on the web. I help promote Coffee Cup Software and attempt to help people to make their web pages better. My page is still growing, and I am still learning myself....

Deck Fountain
This project is what I call a deck fountain, as it is a bit larger than most fountains you might place on a table. I was looking to add an additional stand alone fountain to my deck. I have purchased a few fountains and 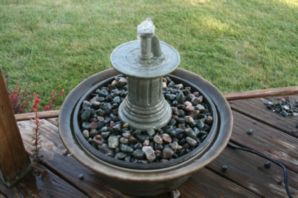 have built some as well. The price ranged anywhere from $150 - $300 at the local stores. This is a lower cost alternative to the big box store prices.
This project was quite easy, taking only about an hour to put together. I built this one for use on my deck, but this could also be placed within a garden area as well. This fountain is self-contained, so it is built similar to many desktop fountains. A small pump is placed in a resovoir of water and is connected via plastic tube to a statue (or other structure) above it. As the water falls off of the statue, it is returned to the resovoir and circulated once again.
To build a fountain, you need only a few items - first and foremost is the pump. The one I am using came from Harbor Freight (the cheap tool store). They had various models in stock - I chose a smaller one, as I was not trying to move a large volume of water. The only other things you need are a wide mouth container for your reservoir (water storage), a top for the container, and a statue or other item that you would like to make into a fountain.
In my case, I found a stone-look sundial pre-drilled for use as a fountain (picked this up at a flea market for $10) it included a tube for connection to a pump. You can use either a pre-drilled item like I had, or locate a small plastic-cast statue and drill it yourself. You could even use a super-thin tall flower pot or even a really cool looking drinking cup (just run to your local Wal-Mart to find ideas). Whatever you use, it should be plastic or a similar material in order to be able to drill it effectively.
I picked up most of my parts from Lowe's, but any hardware store should have what is needed - you might also find most of the items at your local Wal-Mart or Meijer. Shop around a bit for the best price - if you catch end of season deals you might get many of your parts for 1/2 off! Here's my basic list:
| Quantity | Item | Description |
|---|---|---|
| 1 | Flower Pot | 15-17" Flower pot (short - plastic) |
| 1 | Flower pot bottom | 15" or so to fit inside of the pot |
| 1 | Pump | Small fountain pump (statuary pump) |
| 1 | Replacement plug | Plug-in cord end (male) |
| 1 | Stones | Decorative stones (bag) |
| 1 | Fountain top | Statue, fountain head, etc. |
| 1 | Plastic Tubing | 1/2" I.D. tubing to connect to pump |
In addition to the above items, you will also need some silicone caulk, drill, etc.
As you can see in the first picture, I procurred a large flower pot with a lip. This lip is the key to make this into a fountain, as you need it to hold the cover. I also found a flower pot bottom - it is normally used under a flower pot to collect moisture. In my case I am using it as a lid - it just fits in the top of the other pot. This will be used to collect the water from the fountain and channel it back into the resvoir.
Before I give the instructions on building this, just a few notes on safety. First off - if you are not comfortable with a particular tool or procedure - don't do it! When cutting or drilling, remember to wear safety goggles or glasses. If you are using power tools, keep all guards in place. The simplest of procedures can lead to danger if you are not careful. A scout leader I know put it best "If your gonna be dumb, you gotta be tough". Okay, you have been warned...
How to build it
In order to make the fountain look nicer, I wanted the cord from the pump to go through the side wall of the large flower pot (instead of coming out through the top). Since I did not 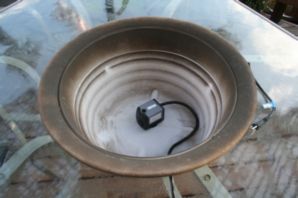 want to cut a giant 1" hole in the pot, I decided to cut the pump cord instead (this allowed for a smaller hole). First cut the end of the power cord off of the pump (there goes your warranty). Drill a hole a little larger than the thickness of the cord through the side of the large pot, and slide the cord through the hole. This allows the pump to sit on
 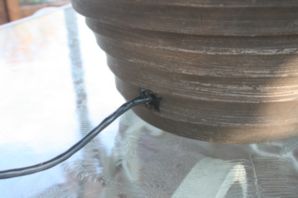 the bottom of the large flower pot with the cord coming in through the side.
In order to prevent leakage, use silicone sealent around this hole on both the inside and outside (let this cure before adding water). Put a dab of the sealent under the pump so that the pump will sit in the center of the pot. The sealent will need to cure before putting water in the large pot.
The cut-off cord end will now need replaced. Unscrew the screw holding the new plug together. Open it up to reveal the interior screws. You should notice a gold screw, a silver screw and a green screw. Unscrew each of them a little, but not to the point that they fall out. Depending on the style of replacement plug, you may need to pass the cord through the cord cover (do this now!). Some plugs do not require this (they split in half when opened).
Using a small utility knife, make a small slice down the side of the insulation to expose the inner wires. Pull the sliced edges away from each other with your fingers to further expose the wires within. Peel the jacket down so that the wires are exposed about 1 inch. Use wire cutters to cut away the jacket and the  strips of paper between the wires. Then, use wire strippers (or a knife) to strip about 1/2 an inch of the insulation from the tips of the wires. Grab the wire covered in black insulation. Roll the wire between your fingers to keep any strands from being left out. Slide the exposed wire under the gold screw and tighten it down. Make sure no stray strands of copper wire are outside of the screw. Follow the same technique for the white wire, placing it under the silver screw. The green wire should connect to the green screw. Slide the cover over the exposed wires now connected to the plug. The insulating jacket should be covered by the plug's cover. If the individual wires are still noticeable after the plug is closed, then take it apart and shorten the wires. Place the screw back into the cover to secure it.
If your sealent has cured, you can test the pump. Add enough water to the large pot to cover the pump by an inch or so. Plug in the cord. Water should run through the pump and out through the top (like a whale). Unplug the pump and set the large pot aside for now.
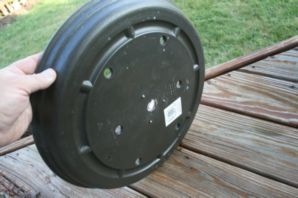
The lid or top of the fountain will need to be drilled to provide drainage. Carefully drill 6-8 1/2" holes around the sides of the lid. You will also need to drill a 5/8" hole in the center for the pump tube. I wanted to raise my statue higher, so I added a PVC riser. The riser is simply a PVC end cap that fit under my statue. If you need a riser, go to your local hardware store and see what they have! The riser is attached using sheet metal screws. After attaching the riser, you will need to drill a hole in the center for the pump tube. The lid is now complete.
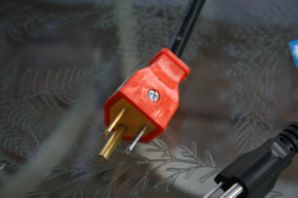
New plug attached to the previously cut cord. Test the pump at this stage!
Bottom side of the lid with holes drilled in it. Note the larger hole in the center.
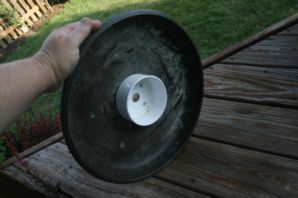

The lid from the front with hole in center for the fountain tube, and around the sides for drainage.
PVC spacer was added to raise the statue higher. Attach with screws if needed.
The top for my fountain is an actual fountain top picked up from a garage sale. If you are lucky like I was, you are all set. If not, you will need to make your own top. If you find a small statue that is made of stone-looking plastic, you can drill through the top with a very long drill 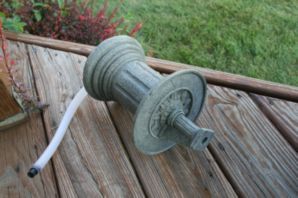 bit (5/8" hole). After drilling, insert a length of 1/2" (inside diameter) tubing through the hole and out through the bottom (leave about a foot out the bottom). Secure the tube in the top with just a little sticking out with epoxy or hot melt glue.
As an alternative to the statue, you could use an actual fountain top. Fountain tops are available in the fountain section at either Lowe's or Home Depot. Most larger gardent stores also have a fountain section. If you choose to use a fountain top, you will need to secure it in the lid with some epoxy or hot glue. If you are using a fountain top, drill the center hole in the lid to match the size of the fountain top tube.
For a really low-cost alternative to the fountain top, you can use a section of PVC pipe secured to the lid. If you choose to do this, you can attach a 2" PVC cap to the lid with screws. Drill a hole in the center (for the pump tube) and add a length of PVC pipe to the top of the cap.

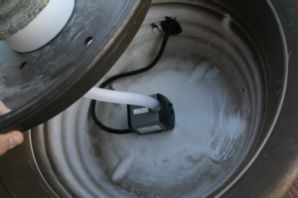
Pump tube coming through the bottom of the lid.
Tube attached to pump and lid. Lower lid slowly to avoid crimping tube.
Final Assembly
Pass the tube from the statue through the lid and hook it to the pump. Lower the lid into position on the large pot. Pour water into the lid in order to fill the large pot. Plug the cord into an  outlet and observe the operation. Water should come out of the top of the fountain and tumble down into the lid. The water should drain through the holes and back to the resovoir.
If the fountain works okay, you can add stones to the top of the lid. Wash the stones before adding them (wash them in a bucket of water). This will avoid making the water too dirty. As an alternative to stones, you can use glass marbles or even lava rock. If you wish to use some very small stones, lay a small circle of door screen on the lid to cover the drainage holes - then add the stones.
Relocate your fountain to its final resting place and hook up the cord once again. If you are placing your fountain in the yard or garden, you may need to level it. Use some small stones or sand for this. Locate your cord at the back of the fountain. plug it in and enjoy!
Final Comments
This project was very easy to build. You can add many fountains for very little money if you shop carefully. I built a similar fountain using a plastic birdbath. The birdbath has a tube running through it for the fountain on top. The bath sits on top of an expanded metal screen over top of a buried resovoir. The birds love it.

