
I became an ambassador for Coffee Cup Software before my page was even on the web. I help promote Coffee Cup Software and attempt to help people to make their web pages better. My page is still growing, and I am still learning myself....
![]()

Dutch ovens have been in use for well over a hundred years. While most are made of cast iron, aluminum ones have been available as well. I have used both with equal results. The cast iron ovens retain heat longer. Lodge Manufacturing Company makes many of the dutch ovens in use today, but you can also find 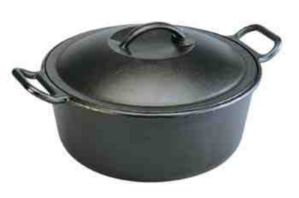 some lower cost imported ones as well. Many dutch ovens (for use in a conventional oven) have a rounded top and flat bottom. Others, called "camp ovens" come with a lip around the top and legs on the bottom. This allows cooking with common charcoal or over an open fire.
Dutch ovens are one of the most versatile cooking utensils on the planet. I've seen people cook everything from whole chickens to soups. They can even be used as a deep fryer (some even come with a fry basket). I have a nice enameled one for at home, but I also have a classic cast iron one for camping. The recipes that follow use either a standard cast iron or aluminum oven. When selecting an oven, bigger is not always better. Larger ovens can weigh in at over 40 pounds! A 10 or 12 inch oven will allow you to cook almost anything. I currently use a 12" one myself.
Seasoning your oven
The classic cast iron oven requires seasoning before you use it for the first time (most of my recipes don't require seasoning - more on this later). Seasoning is the process of coating the inside of the oven with oil and "baking" the oil into the surface. As the oven is used more and more, the seasoning gets better and better (just like a cast iron pan or a well used wok).
Prior to seasoning, you will need to wash your pot with hot soapy water and a good scouring pad. Most ovens come shipped from the factory with a coating to prevent rust while being shipped and stored - This coating needs to be removed before seasoning. Just make sure that your oven requires seasoning before use. There are quite a few ovens available now that are pre-seasoned from the factory. These come with a wax surface that must be cooked or cleaned off before use.
To season a new one: wash and dry the new pot. Coat the pot & lid inside and out with vegetable oil (avoid animal fat) and put the pot in a 500° oven or on a grill for a couple of hours. It is best to do this with the pot face down in the oven (that avoids "pooling" of the oil in the center of the pot). Turn off the oven and allow it to cool down. Wipe excess oil out of the pot and repeat the procedure a second time. After the second time, turn the oven off and allow to cool yet again. Wipe off the extra oil and the pot should be ready to use or store.
Before starting to cook with your new oven, you will need some additional supplies: Long handled tongs for moving hot charcoal around, a pair of pliers for removing the lid of the oven, and a pair of gloves for handling the oven (I found a pair of cheap welding gloves that work great).
The Chimney Starter
Most of my cooking with the dutch oven has been done using charcoal. Charcoal has the advantage of consistent temperature and long burning. On the subject of charcoal, if 
you are going to use charcoal with your oven (or even for your home grill) you will need a good method of lighting it. I have tried various methods, but nothing seems to beat a good chimney starter. You can find a great one for less then $14.00. The one that I am using is a Weber Chimney Starter. It is larger than some of the cheaper made units, and can hold almost 80 charcoal briquettes.
The Chimney starter is easy to use. First, find a good surface to place it on. I either place it on the ground or on top of my grill. Don't lay it on your driveway, as it will destroy your concrete or pavement.
Turn the unit upside down, and loosely roll a single sheet of newspaper on the diagonal to form a large tube. Form the tube into a circle and fit it into the bottom of the starter. Do this again with a second sheet. This will leave an opening in the center that will allow air to flow as the newspaper is lit. Turn the unit right side up and fill with the quantity of charcoal you are planning to use. Light 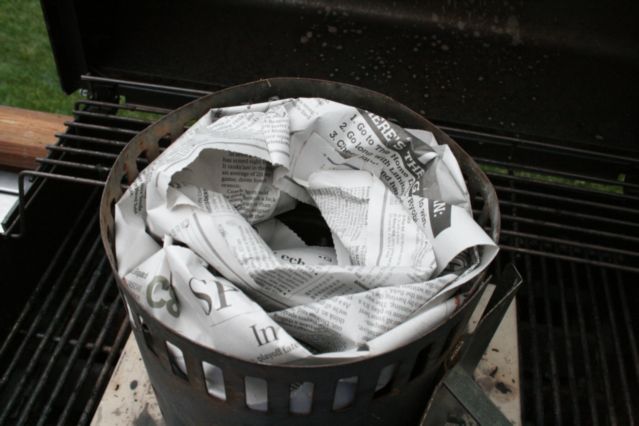 the newspaper and the charcoal should start. Wait a few minutes and hold your hand above the charcoal. If you feel heat, then the charcoal is lit. It will take about 10-20 minutes to fully light. When you see flames coming from the top of the starter, the charcoal is ready. Wait much longer and the charcoal at the bottom will be unusable.
When the charcoal is ready, dump it onto the ground (in a fire pit or a other fire safe area). Using tongs, place 10-12 of the briquettes in a circular pattern on the ground. Place the oven (with food inside) on top of the just placed charcoal. Close the lid of the oven, and place 14-18 coals on top of the lid, evenly spaced. Take an additional 10-12 briquettes, and surround the outside edge of the oven as well (seems to help in more even baking). Rotate the oven a quarter turn every 10 minutes to avoid hot spots (you can even do the same with the lid as well). The oven should reach approximately 350 degrees for about 50 minutes. That's enough time for most cakes and pies. If you need more time, you will need to fire up additional charcoal.
After using your oven, you will need to clean it. People will tell you not to use soap in a dutch oven - I have never found it to be a problem. Wash your oven with warm soapy water and dry it. Before putting it away, coat the inside with a light coat of vegetable oil. I store mine in the top of a milk crate.
Now that you know how to use it, let's go make something...
